SQL Server provides us with a number of high availability and disaster recovery solutions that help in making the data that serves the critical systems available for the longest possible time with the least possible downtime. These high availability and disaster recovery solutions provided by Microsoft SQL Server are discussed in the SQL Server Transaction Log and High Availability Solutions article.
In this article, we will show how to set up and configure an Availability Group site and configure it to meet the company requirements. But let us start with a brief overview of the Always-on Availability Group feature to be familiar with it.
Overview
SQL Server Always-on Availability Group, introduced in SQL Server 2012 version, is an enterprise-level high availability and disaster recovery solution that is built over the Windows Server Failover Clustering feature, in which one or multiple databases can act as one availability group and failed over as a single unit.
The Availability Group is a container for a set of databases that are hosted in one primary replica, contains the read-write copy of the databases, and synchronized with up to eight secondary replicas, contain a read-only copy of these databases.
As an alternative for the database mirroring feature, Always on Availability Group can be used to reduce the load on the primary instance by configuring the secondary replicas to handle the read-only workload and backup operations. In this way, the Always-on Availability Group can be used to improve the availability of the databases and enhance the SQL Server resource utilization for all replicas.
The synchronization process between the Availability Group replicas can be performed in one of two supported availability modes:
- Synchronous-commit mode: In this availability mode, the primary replica will wait for the secondary replicas, up to two synchronous secondary replicas, to confirm writing the log in their database transaction log file, before committing it at the primary replica. This availability mode increases the data availability level over the transaction latency price.
- Asynchronous-commit mode: This availability mode is used mainly to synch with the disaster recovery replicas, that are distributed over distanced data centers, where the primary replica will not wait for the secondary replicas, to confirm hardening the log to commit transaction at primary side, providing less data availability level and fewer transactions latency.
The Always-on Availability Groups failover process, in which the primary role will be changed between the replicas, can be performed manually by the database administrator or automatically by the SQL Server itself in case of any server-level failure, taking into consideration that this failover will not happen in case of any database-level issues such as database corruption.
For each Availability Group, a Server name can be created to provide the clients with the ability to connect directly to the Primary replica or the read-only replicas without recalling the underlying SQL Server instance names and roles within the availability group. This server name is called the Availability Group Listener.
Demo Scenario
After providing a brief introduction for the Always-on Availability Group feature, we are ready to set up an Availability Group and configure it properly. In this demo, we will create an Availability Group to replicate the AdventureWorks2017 database between two SQL Server instances; SQL1 and SQL2, with SQL Server 2017 already installed on these servers.
For testing and demo purposes, the SQL Server Services in both SQL1 and SQL2 instances are running under the ay\sqladmin service account, that has proper permissions on these SQL Server instances.
Getting Started
As mentioned in the overview of this article, the Always-on Availability Group feature is built over the Windows Server Failover Cluster feature. So, we need to create a failover clustering site over which we will define the Availability Group site.
Create a Failover Cluster
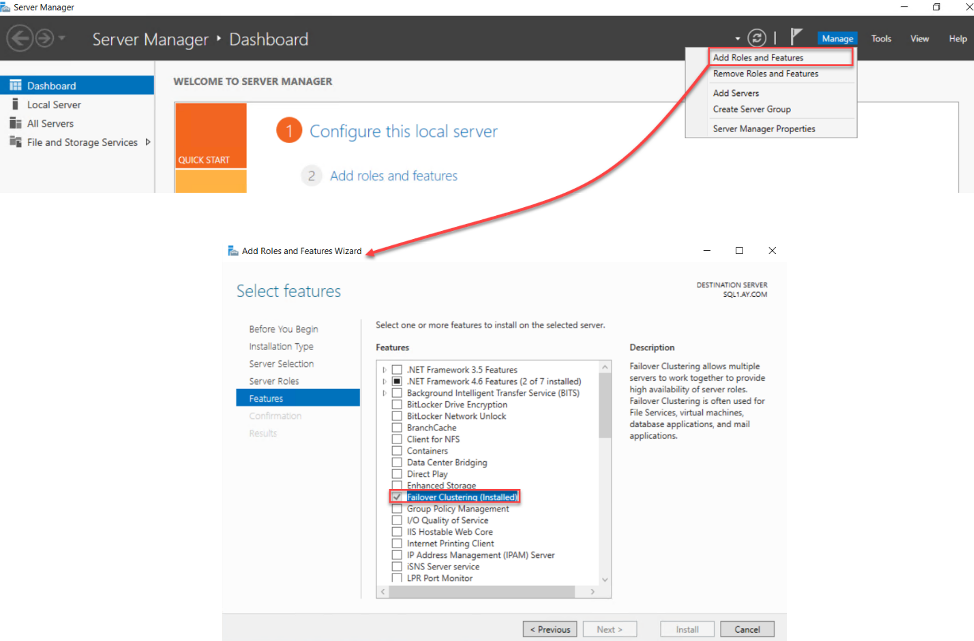
First of all, we need to make sure that the Failover Clustering feature is installed on all replicas that will participate in the Availability Group site. This can be performed by opening the Server Manager dashboard on each replica and choose the Add Roles and Features option from the Manage menu, then check and install the Failover Clustering feature from that wizards, as shown below:
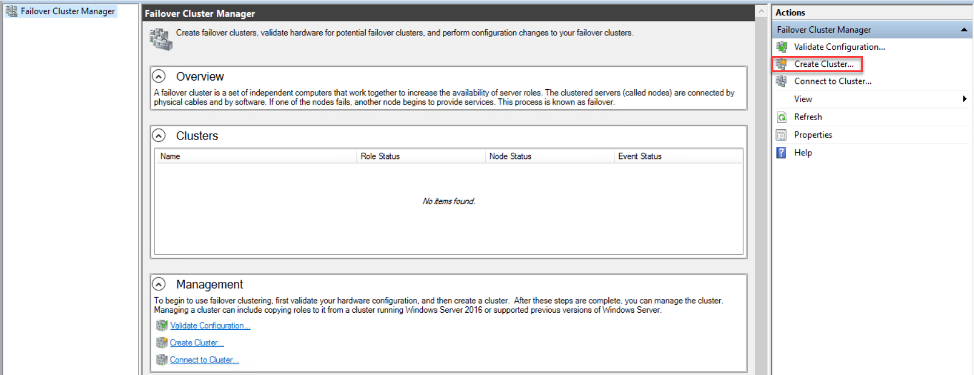
After installing the Failover Clustering feature, open the Failover Cluster Manager window in one of the replicas, using an authorized local administrator account with Domain Administrator privileges that allow it to create that cluster name in the active directory, and click on the Create Cluster option, as below:
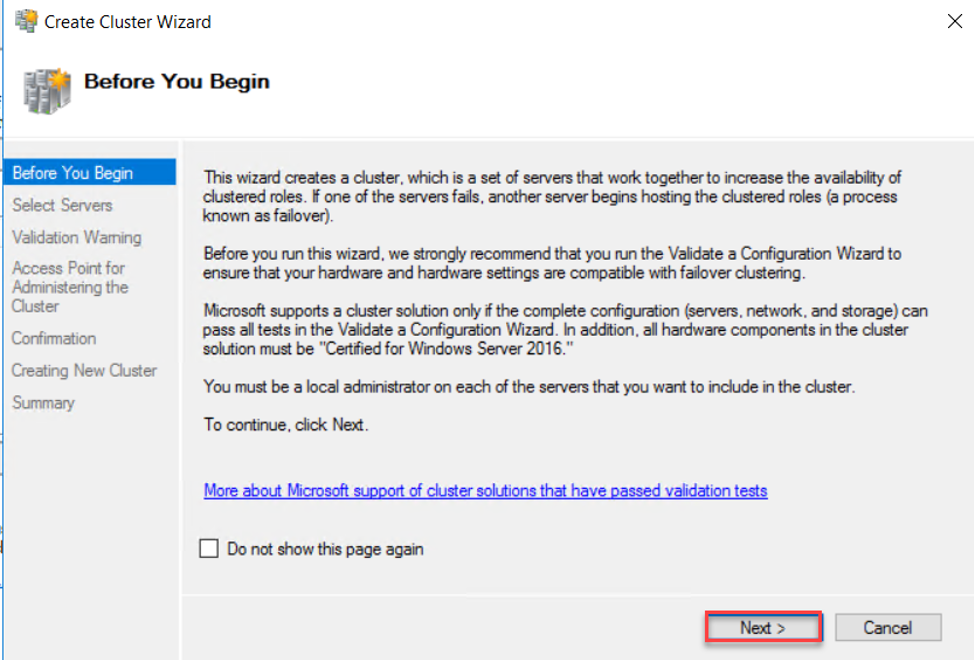
From the opened Create Cluster Wizard, check the provided instructions in the Before You Begin window, and click Next to continue:
In the next page, provide the name or IP of the replicas that will participate in the Availability Group then click next to continue:

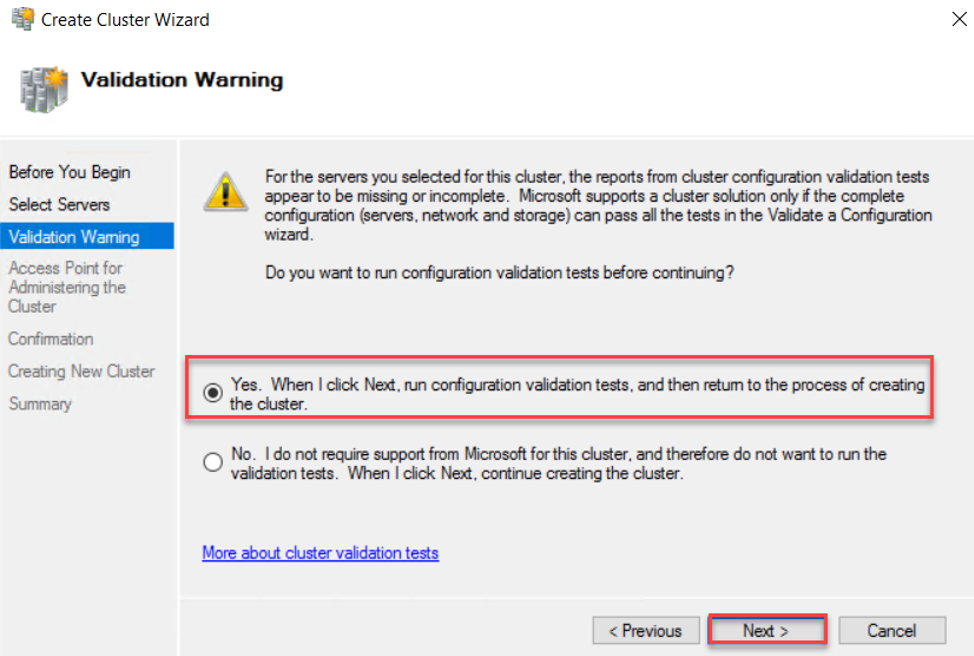
After that, you need to specify whether to run the cluster validation test, to validate that the resources available on these servers are compatible with the Failover Clustering feature, before creating the Failover Cluster or not. It is always recommended to perform the validation test at that step before trying to create the Failover Cluster site.
This will direct you to the Validate a Configuration Wizard. In the first page of the validation wizard, check the wizard instructions and click Next to proceed:

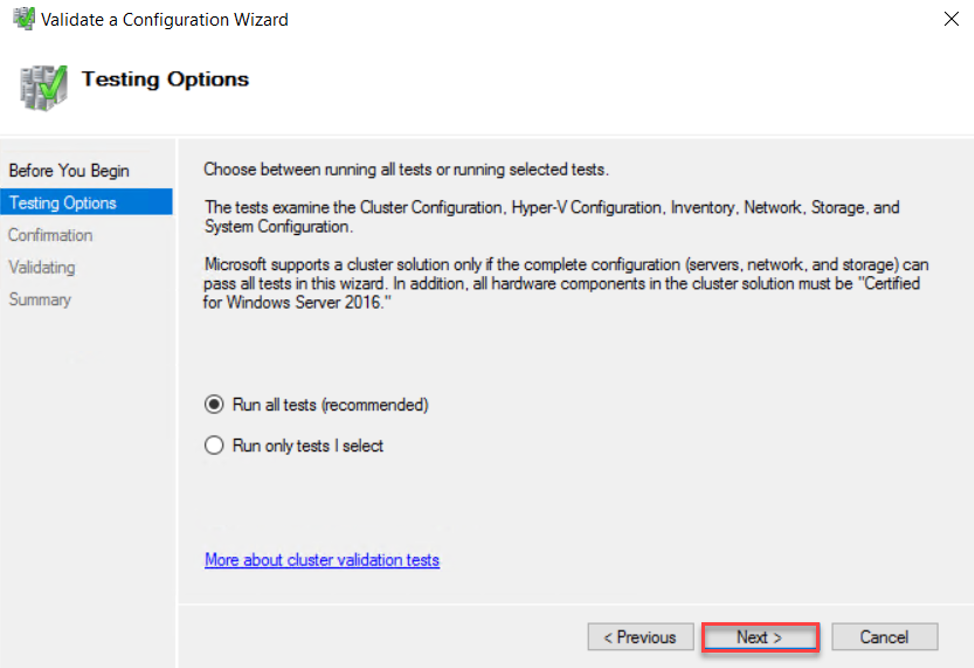
After that, you need to specify whether to run all Failover Cluster validations, which is the recommended option, or select specific faster tests. In this demo, we will go with the Microsoft recommended option and perform all validation tests, then click Next to continue:
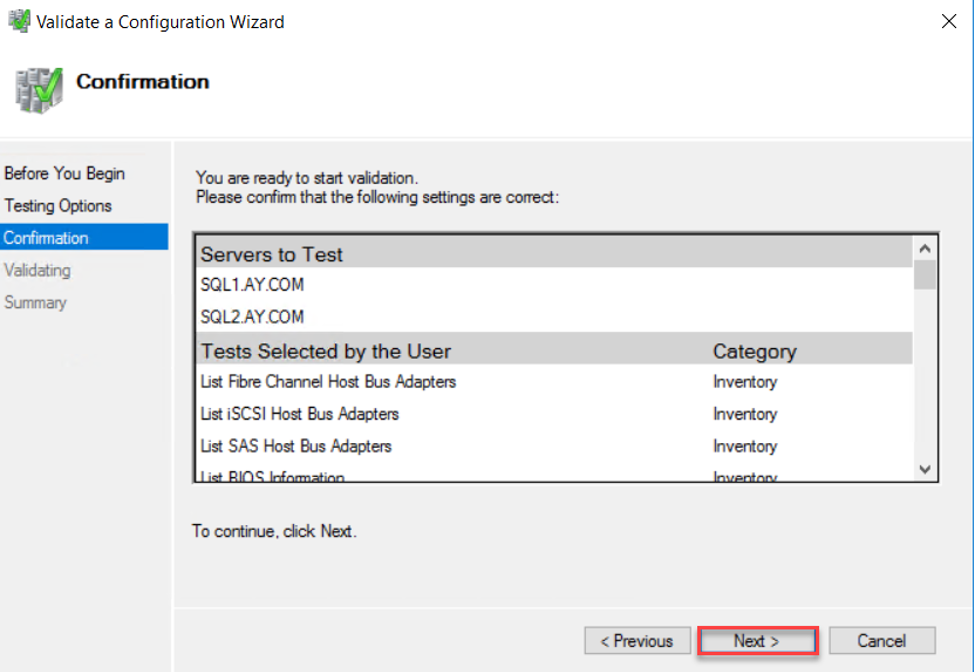
And you can review the validation tests that will be performed within this validation wizard and confirm to proceed by clicking on Next, as follows:
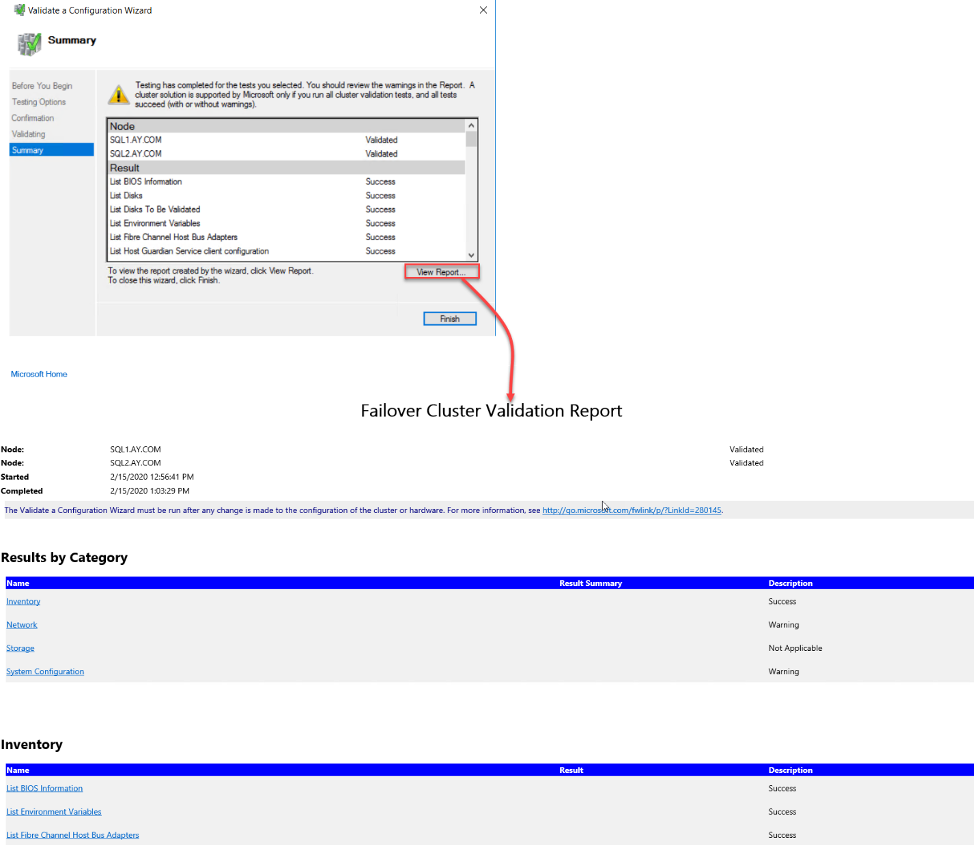
When the validation process completed, you can click on the View Report button to review the validation test result or export it to another engineer to fix any faced issue, or click on Finish directly to start the cluster creation process, as below:
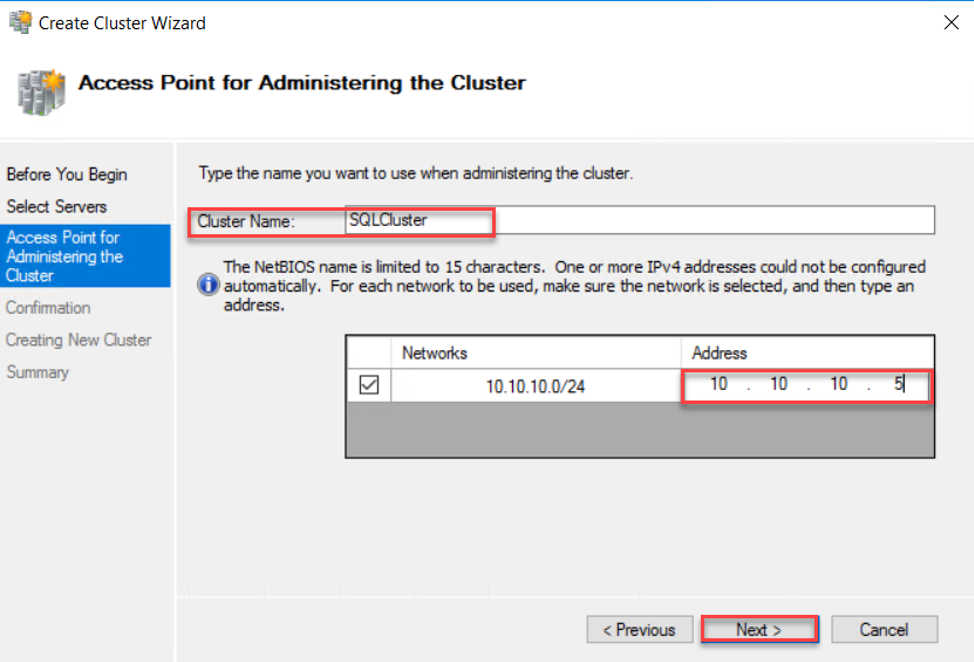
For now, we checked that our servers are compatible with the Failover Clustering feature requirements and we can continue to create the Failover Clustering site. In the Access Point for Administrating the Cluster window, provide a unique name and IP address for the Failover Cluster, then click Next to continue:
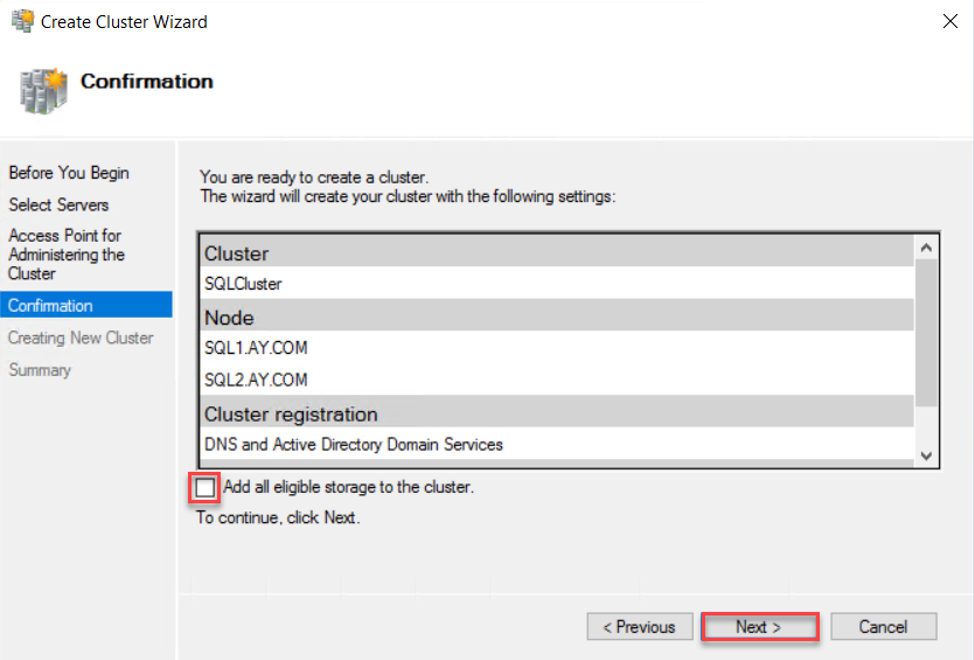
After that, review the cluster creation settings that you provide, and make sure to remove the check beside the Add all eligible storage to the cluster, as the Always on Availability Group feature works using on dedicated storage for each server and NOT shared storage. If you are fine with the settings, click Next to proceed:
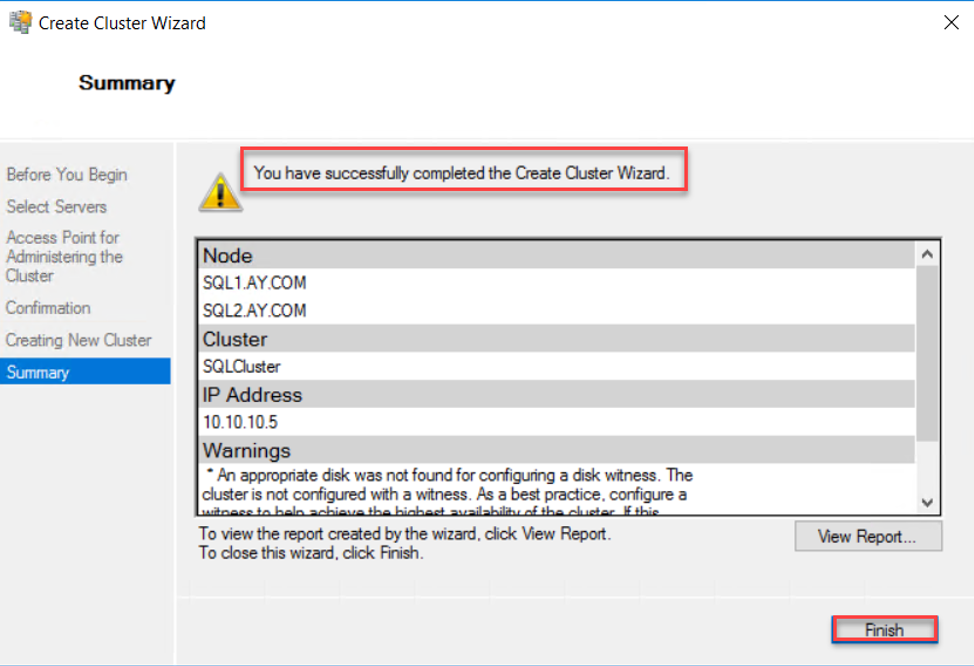
Once the Failover Clustering site is created successfully, the wizard will notify you with a message that the Failover Clustering site is created completely, as below:
You can verify that the Failover Cluster site is created successfully, by opening the Failover Cluster Manager, that will show you the created cluster site, and all components of that cluster as shown below:

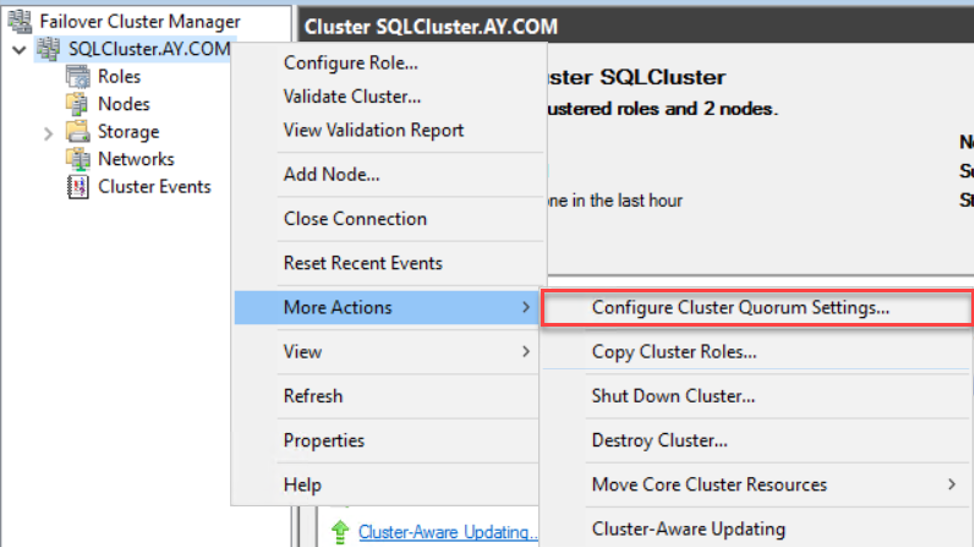
In order to keep the Failover Cluster site in the best availability mode, you need to configure the cluster Quorum that controls when to keep the Failover Cluster online or turn it offline based on the nodes and resources votes. To configure the cluster quorum, right-click on the cluster name, under the Failover Cluster manager, and choose the Configure Cluster Quorum Settings option from the More Actions menu, as below. For detailed information about the quorum settings that suites the Always on Availability Group feature, check the Windows Failover Cluster Quorum Modes in SQL Server Always On Availability Groups:
Enable Always on Availability Group Feature
After creating the Failover Cluster, over which the Availability Group will be created, we need to enable the Always-on Availability Group feature and connect it to the Failover Cluster site that will be used.
To enable the Always-on Availability Group feature, open the SQL Server Configuration Manager -> SQL Server Services then right-click on the SQL Server service and choose the Properties option. From the SQL Server Service properties window, move to the Always-on Availability page and check the “Enable Always on Availability Groups” box, under the automatically detected Failover Cluster name, as shown below:
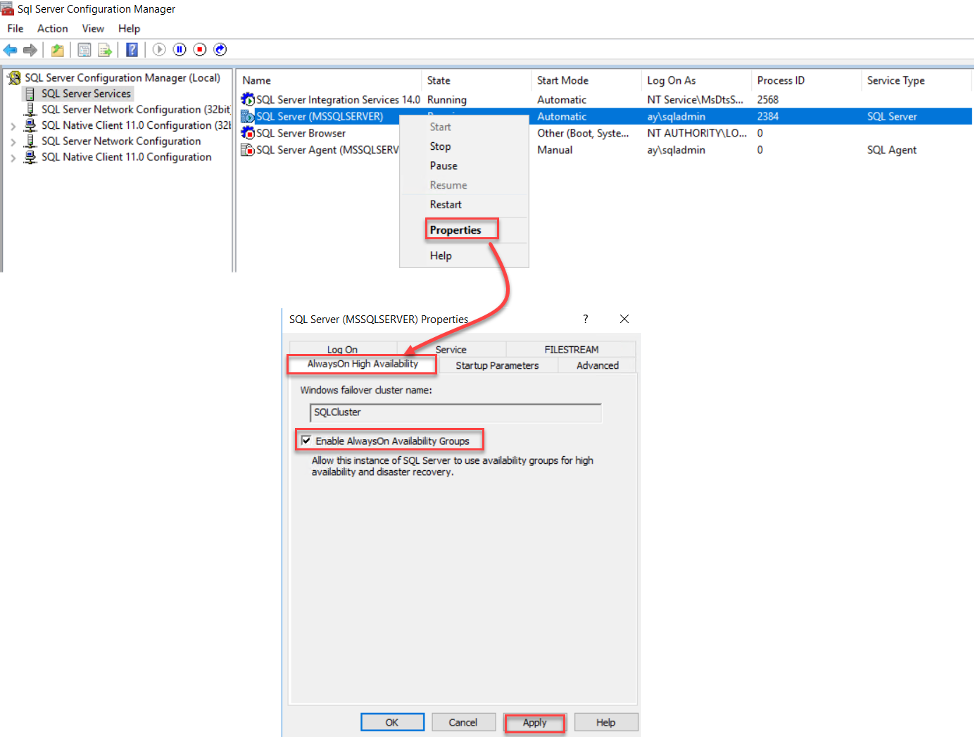
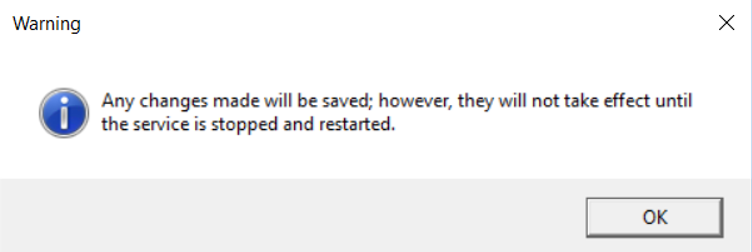
Take into consideration that, this change should be performed on all replicas that will participate in the availability group and will take effect after restarting the SQL Server service, as below:
Create New Always-on Availability Group
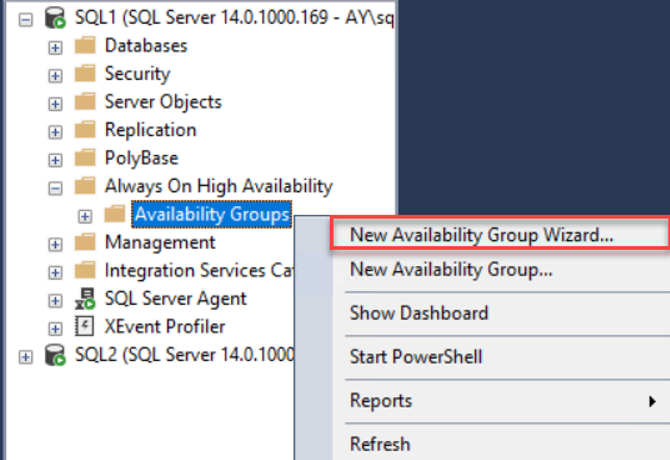
After enabling the Always-on Availability Group feature, we will start creating the new Availability Group by expanding the Always-on High Availability node, under the SSMS Object Explorer, then right-click on the Availability Groups node and choose the New Availability Group Wizard, as shown below:
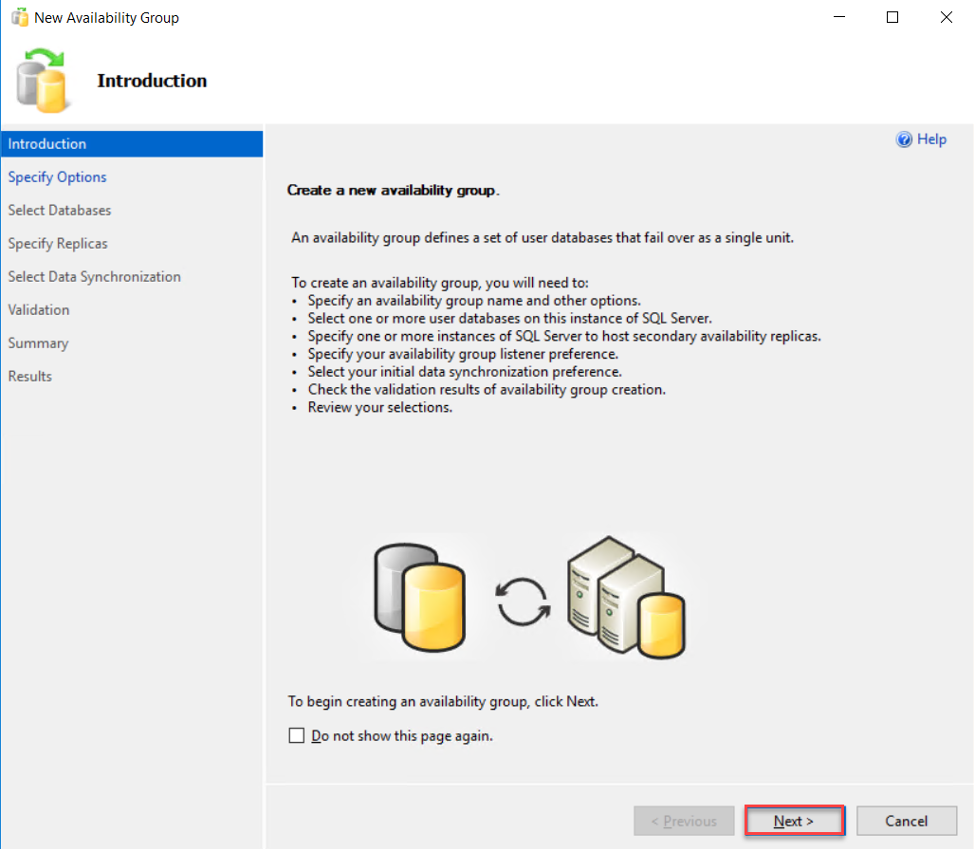
The first page in the New Availability Group wizard is the Introduction page, in which you can find a brief description of the steps that will be performed under this wizard to create a new Availability Group. Review the provided summary then click Next to continue:
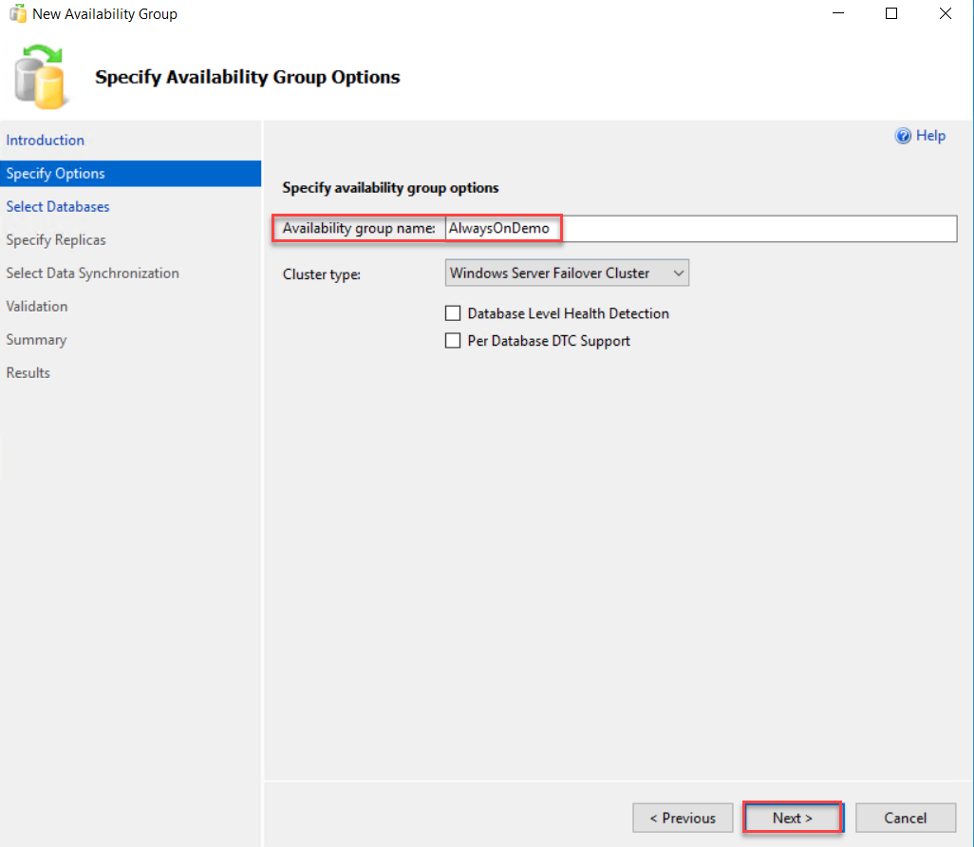
In the Specify Availability Group Options window, you need to specify the name of the Availability Group, the type of the cluster, based on the SQL Server version and Operating system used on the replicas, where you can choose from the Windows Server Failover Clustering, non-Windows EXTERNAL cluster or NONE if no cluster is used.
This page allows you also to enable the Database level health detection option, that checks when a database is no longer in the online status, and perform the automatic failover of the availability group and enable the distributed transactions in availability groups per each database, as shown below:
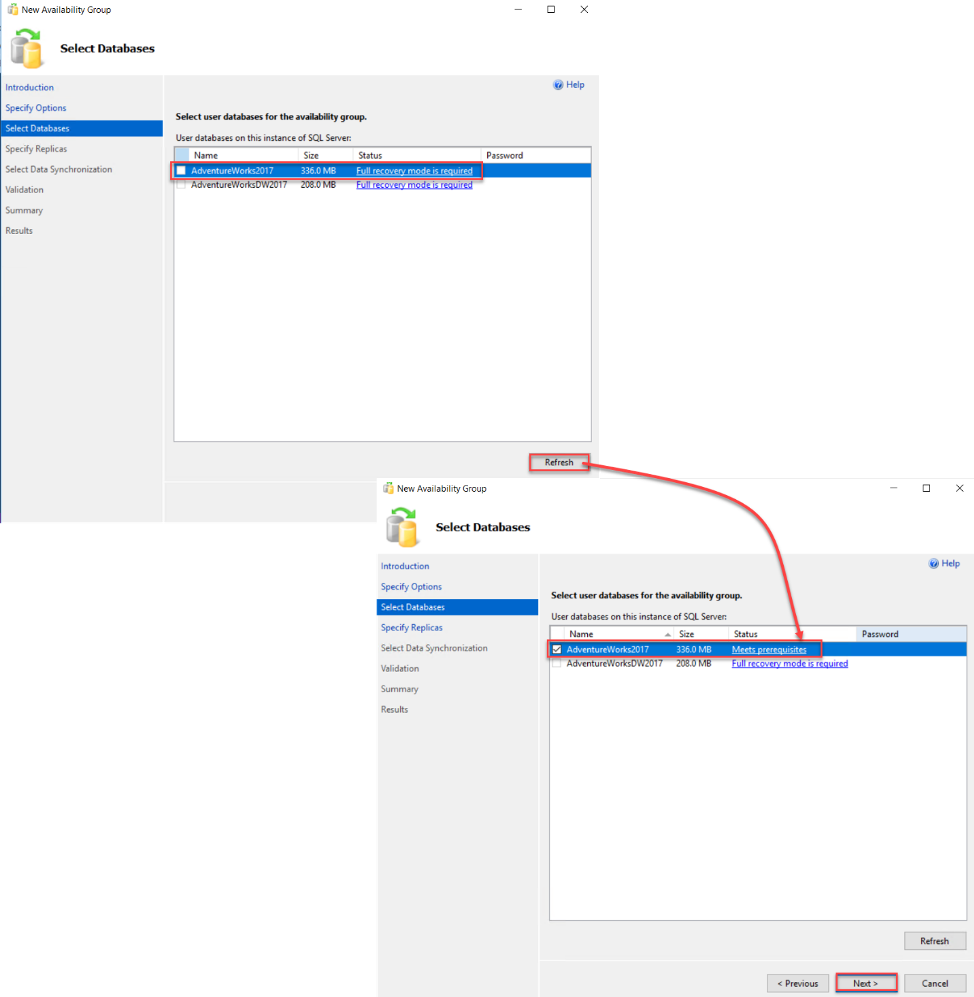
After that, you need to select the database(s) that will participate in that Availability Group. The wizard will check the pre-requests for the database in order to be added to the Availability group, including the Full recovery model of the database and that a full backup is taken from that database before adding it. After meeting the requirements for the database(s) to be included, refresh the databases list, check the database then click Next to continue:
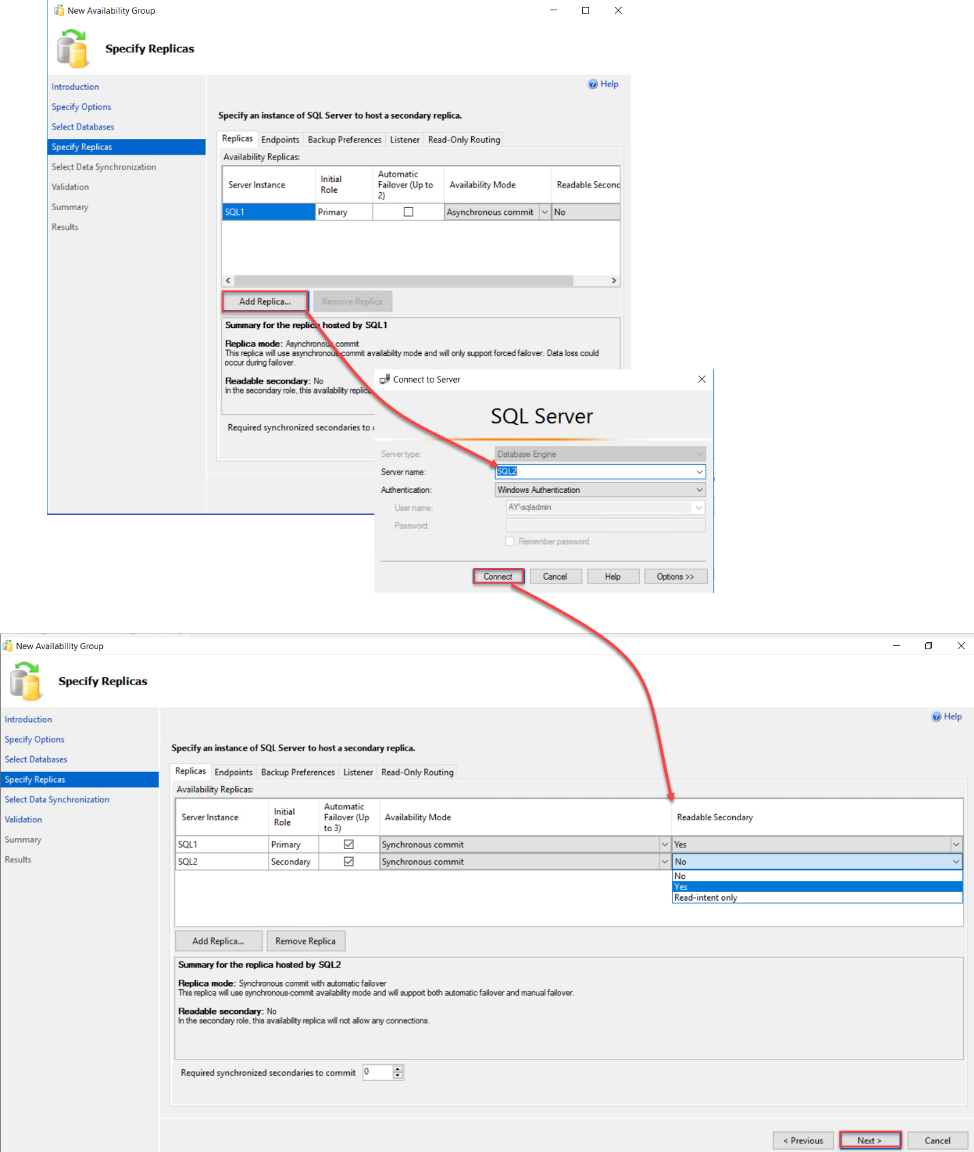
On the next page, under the Replicas tab, you need to add all SQL Server replicas that will participate in this Availability Group and host a copy from the included databases. After adding the replicas, you can choose up to three instances to be configured with the Synchronous commit availability mode and allow the Automatic Failover between these replicas and the rest of replicas that will be configured with Asynchronous commit mode. You can also decide whether to configure each replica as readable secondary for read-only connections or read-intent readable replica to handle read-only workload directed automatically by the listener, as shown below:
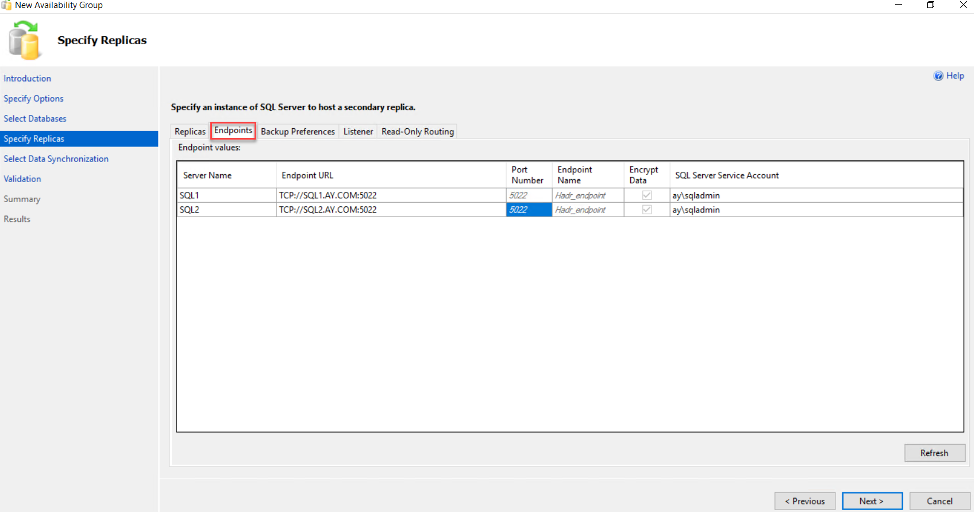
In the Endpoints tab, check the settings of the connection endpoints that will be used for the communication between the replicas, where you need to make sure that the used TCP port is enabled in the firewall rules of all replicas and that the provided service account has Connect permission on the endpoint of the replicas, as below:
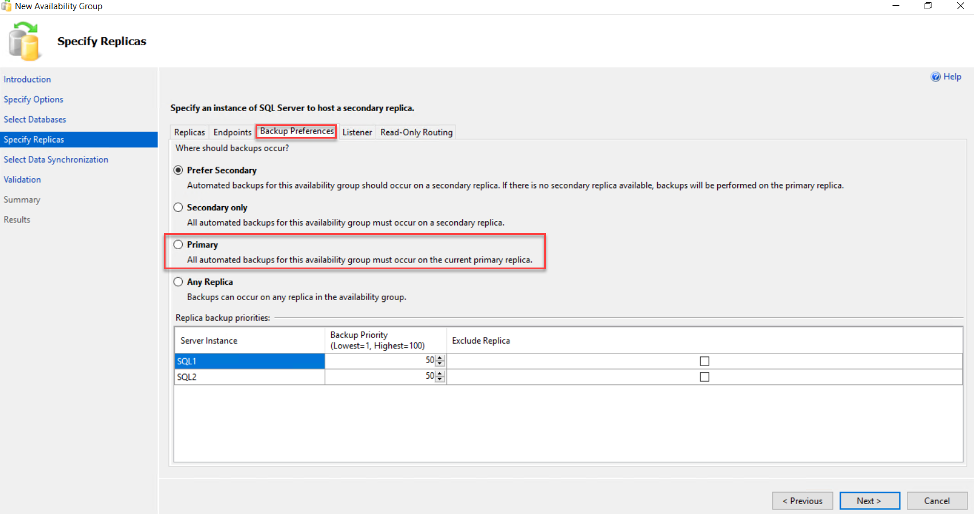
In the Backup Preferences tab, you need to specify the location where the backup jobs will be executed in the availability group. It allows you to perform an automatic backup from the secondary replica as a preferred option, the secondary as a must, the primary as a must or at any replica. Based on this option, you can create the maintenance plan to take a backup from the databases participating in the availability group, as below:
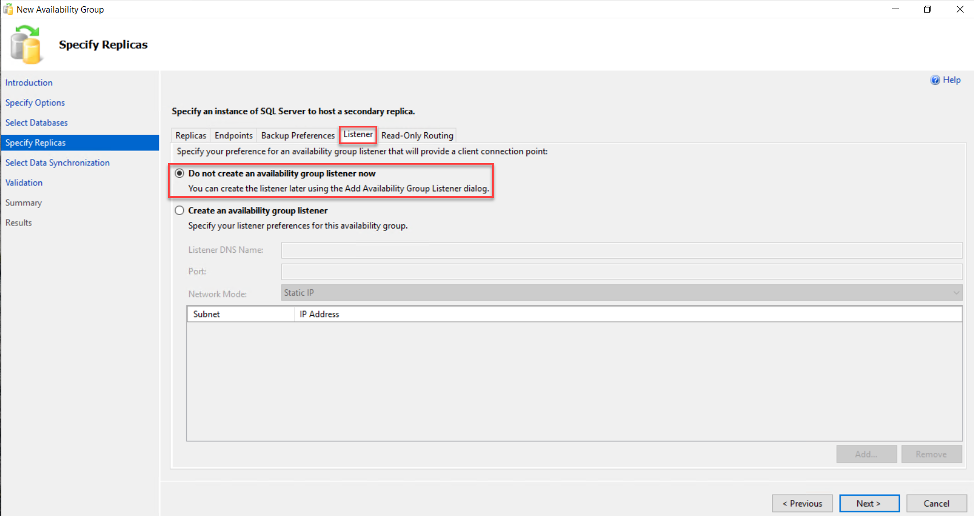
From the same window, you can also define the availability group listener settings, under the Listener page or proceed without creating the listener for now and perform the creation later. In this demo, we will configure the listener after creating the availability group, as shown below:
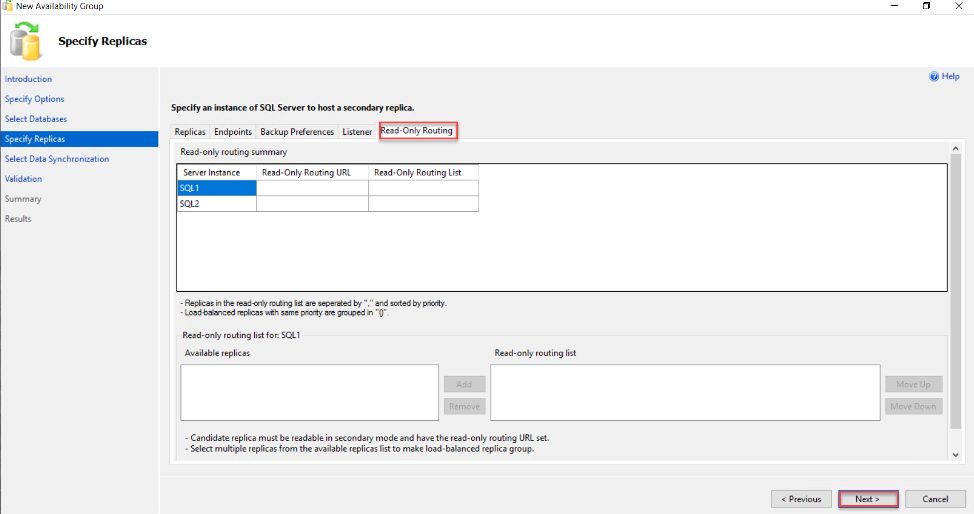
Also, you can use the Read-Only Routing page to define the read-only routing list, that is used to control the read-only workload within the secondaries. For more information, check How to Configure Read-Only Routing for an Availability Group in SQL Server 2016:
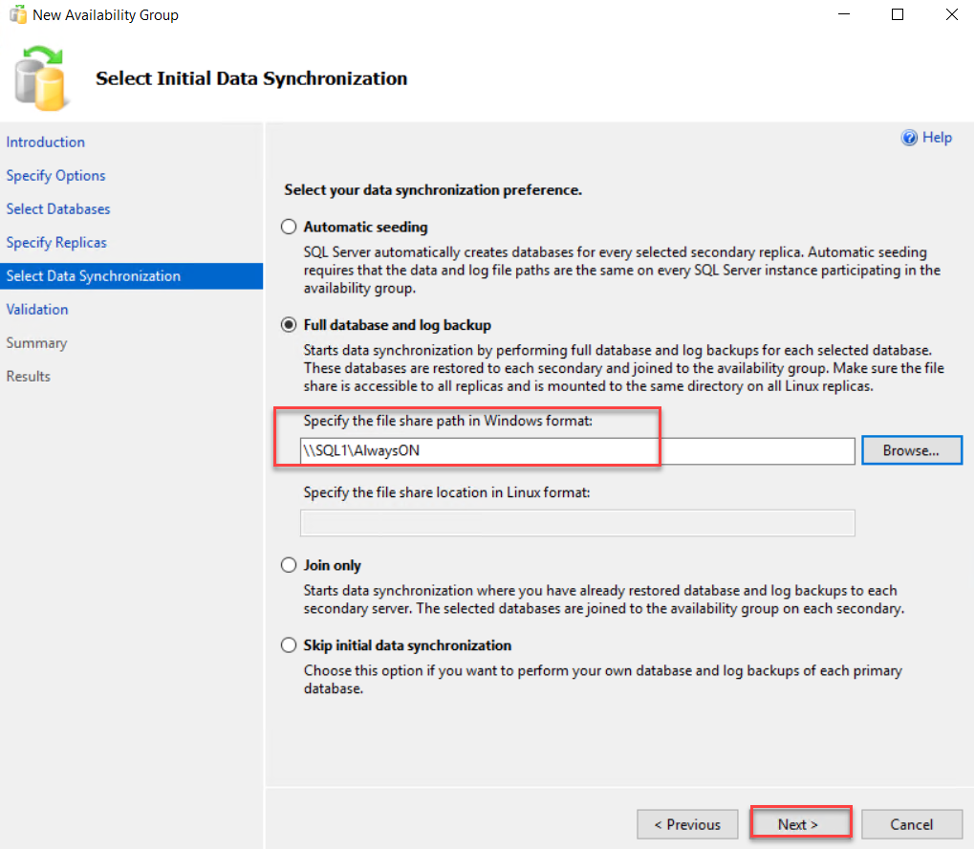
On the next page, you need to specify the mechanism that will be used for the initial data synchronization process between the primary and secondary replicas, with the ability to perform the synchronization automatically or manually by joining the secondary to the availability group and synchronize the databases later manually.
There are two automatic synchronization methods available in that wizard, the first one is specifying a shared folder to copy the full and transaction log backups temporarily and perform the restore automatically, which we will use here in this demo, or use a Direct Seeding method without taking backup, as described in the SQL Server 2016 Always On Availability Group with Direct Seeding:
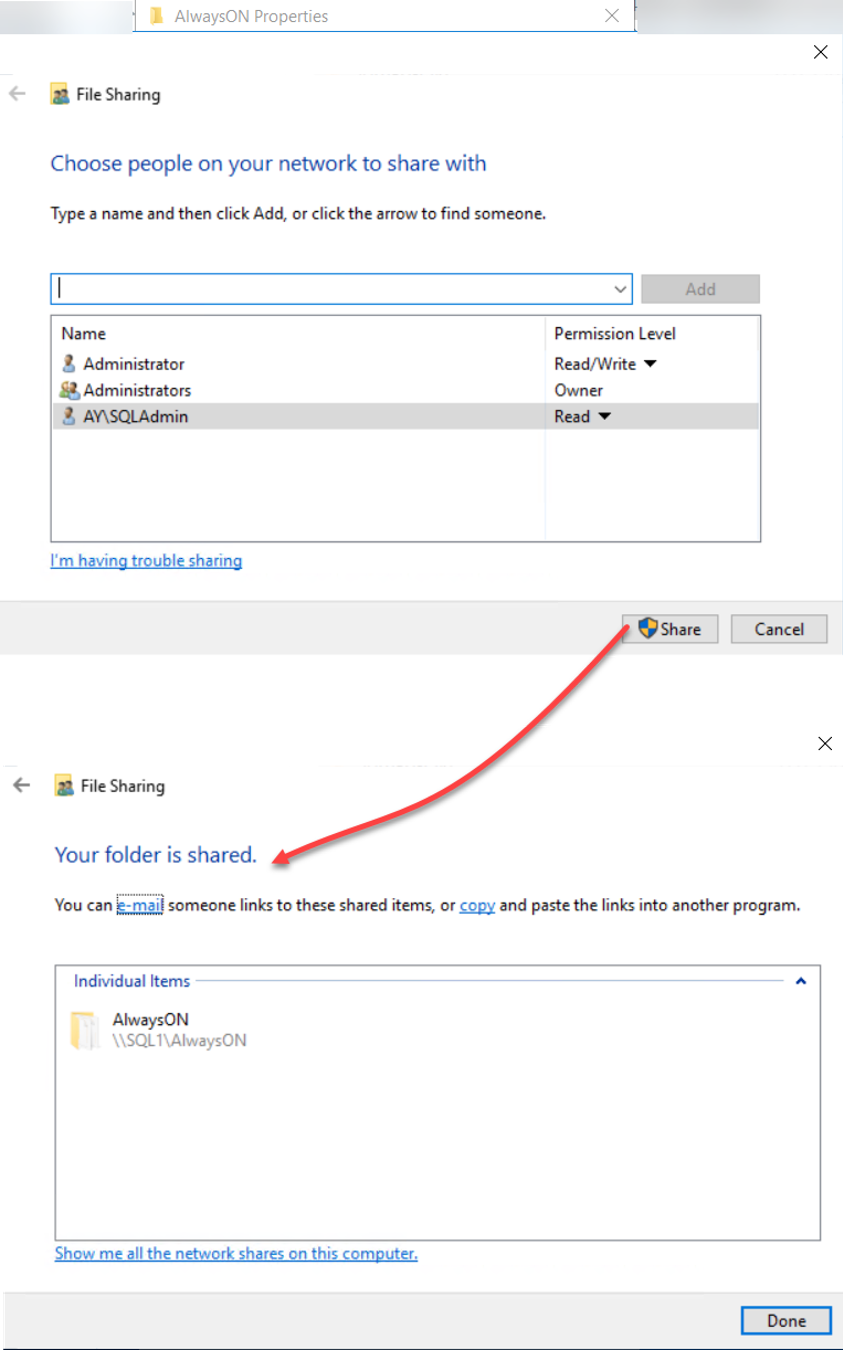
In order to use the Full Database and Log Backup method, we need to create a shared folder and provide the SQL Server services accounts for the replicas read and write permissions on that folder, as shown below:
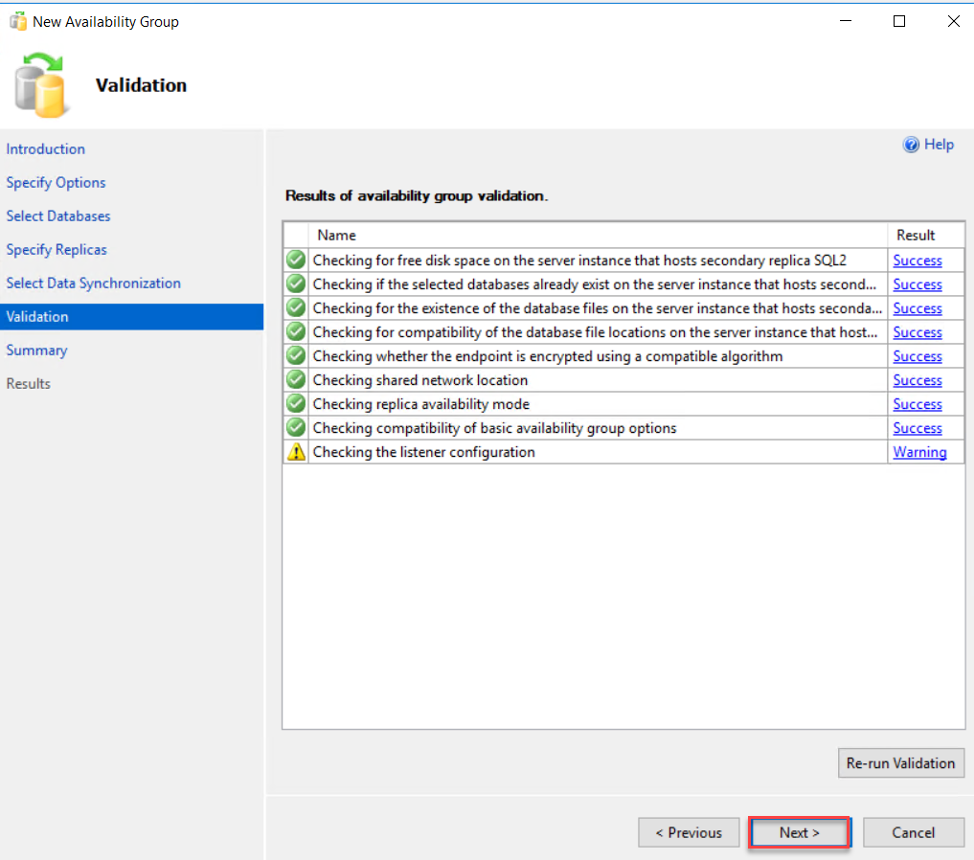
After that, the New Availability Group wizard will perform a validation check for all configuration before proceeding with the availability group creation process. If there is any error, you can fix it directly then refresh the page and click Next to proceed:
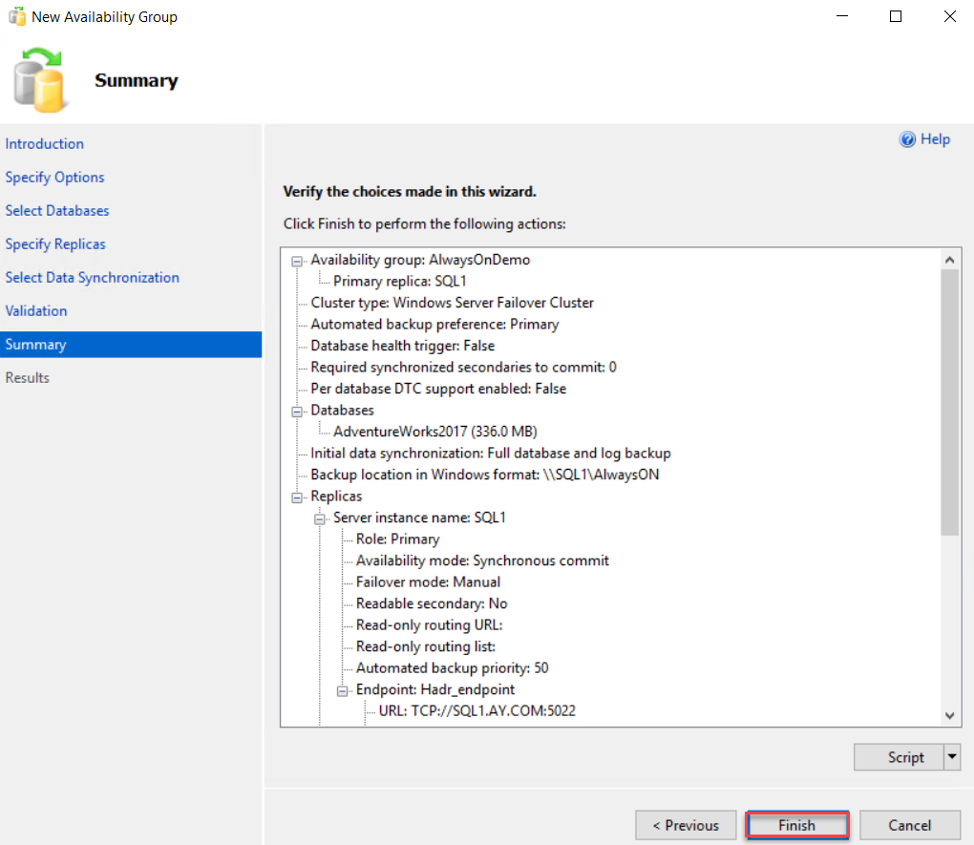
At the final stage, the wizard will provide you with a summary for all wizard configurations to review it then click Finish to start creating the availability group, as below:
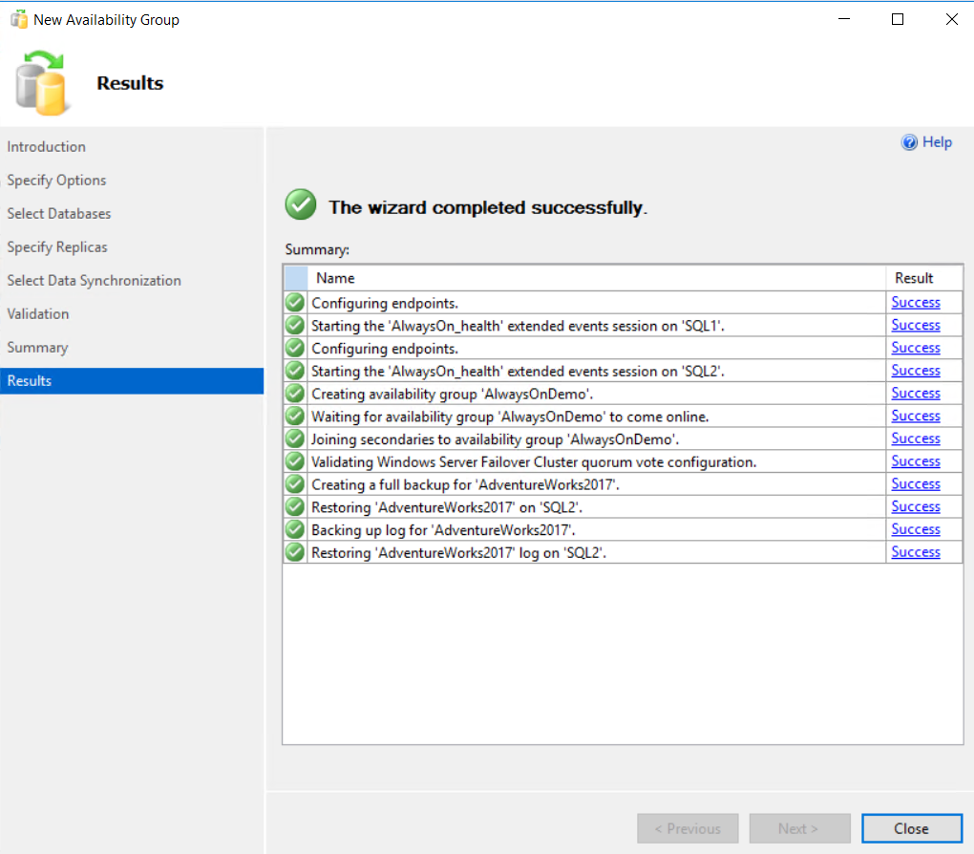
When the wizard completed, it will show you the result of each step and if there is any error faced. Otherwise, it will display a message that the Availability Group is created successfully with no issue, as shown below:
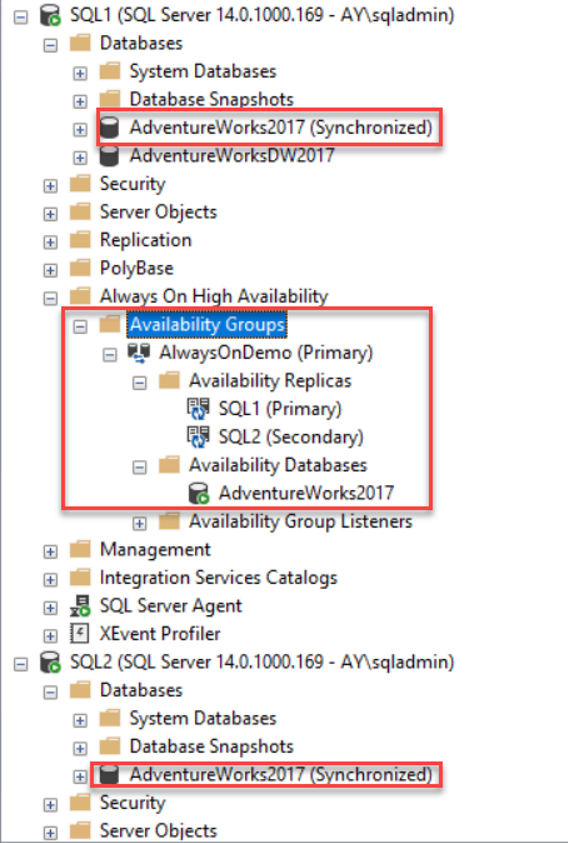
You can also validate that the Always on Availability Group is created and configured successfully using the SSMS Object Explorer, by checking that the participating database(s) in a Synchronized state in all replicas and that the replicas and databases are online under the Always-on High Availability node, as shown below:
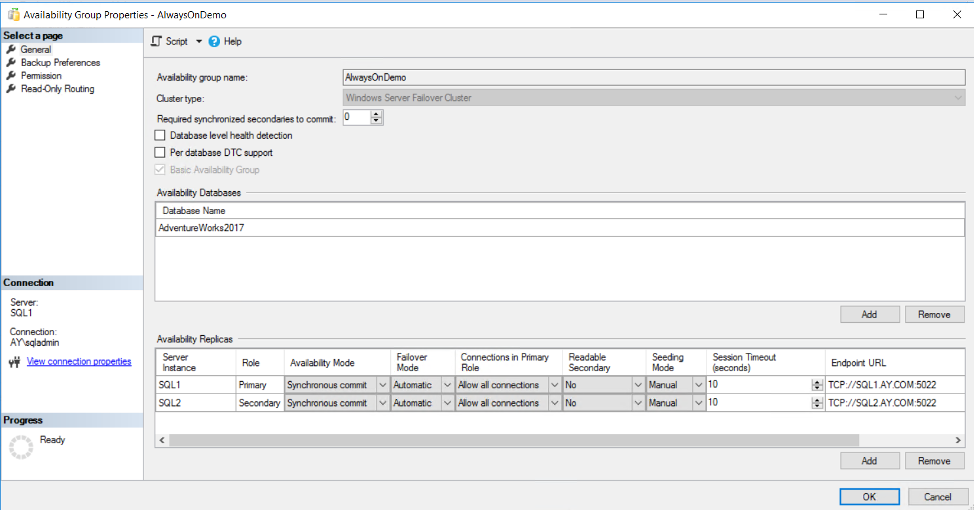
You can also connect to the Primary replica, with the Primary word beside the availability group name, and check the Availability Group properties page, with the ability to perform the same tasks that we performed under the New Availability Group Wizard, such as adding new replicas, adding new database, changing each replica configuration, changing the backup preferences and defining a read-only routing list, as shown below:
Create Always-on Availability Group Listener
The last step in configuring the Availability Group is creating the availability group listener that will be used when connecting to the primary and secondary replicas without specifying the replica name.
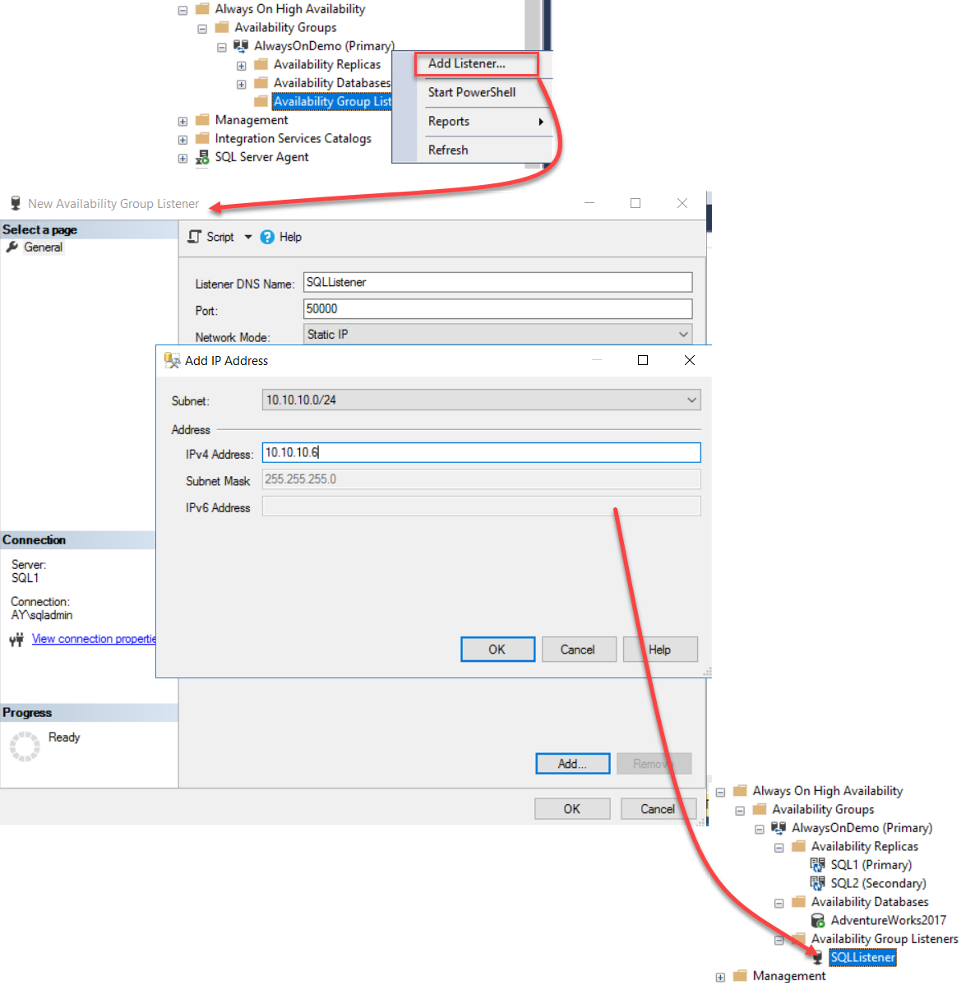
To create the availability group listener, right-click on the Availability Group Listener node under the created availability group node and choose the Add Listener option. From the opened New Availability Group Listener window, provide the name of that listener, the TCP port that will be used to connect to that listener and the static IP address that will be assigned to the listener then click OK to create it. When the listener is created successfully, the window will be closed automatically and the listener name will be displayed under the Listener node, as shown below:
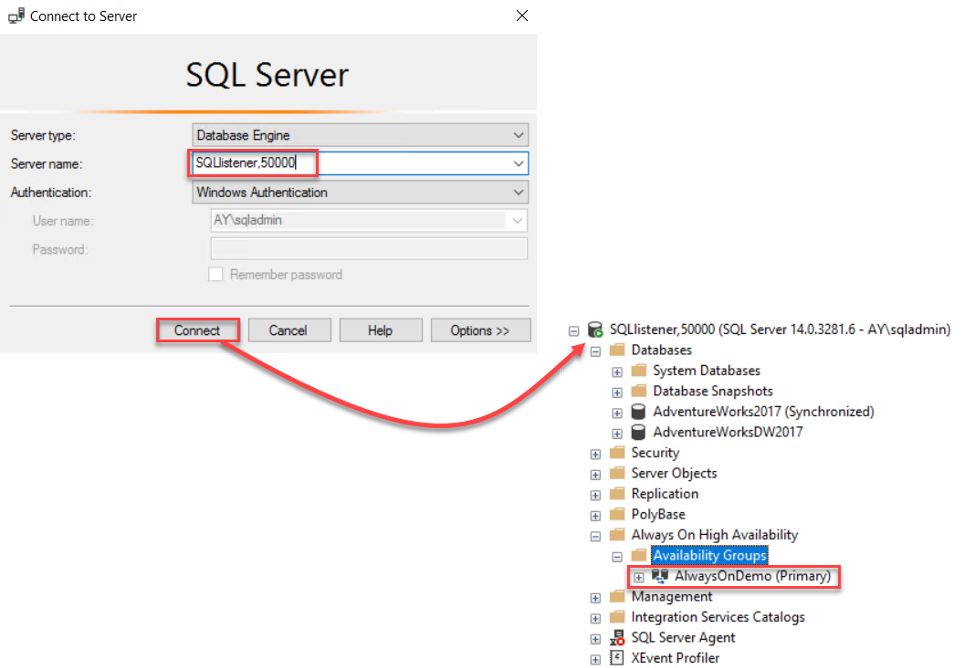
To connect to the Availability Group using the listener name, provide the name or the IP of the listener with the TCP port number in the Connect to Server and it will connect directly to the primary node, as shown below:
Test Failover Process
After testing the connection to the Availability Group listener and the replicas, we need to perform an important test for the failover, to make sure that the primary role will be moved between the replicas without any issue, and that the databases will be reachable and in the synchronized state after the failover.
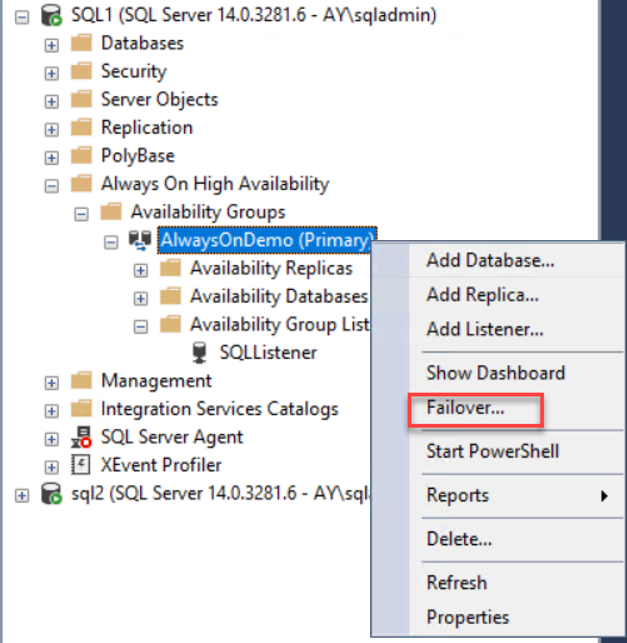
To perform a manual failover, right-click on the availability group name and choose the Failover option, as below:
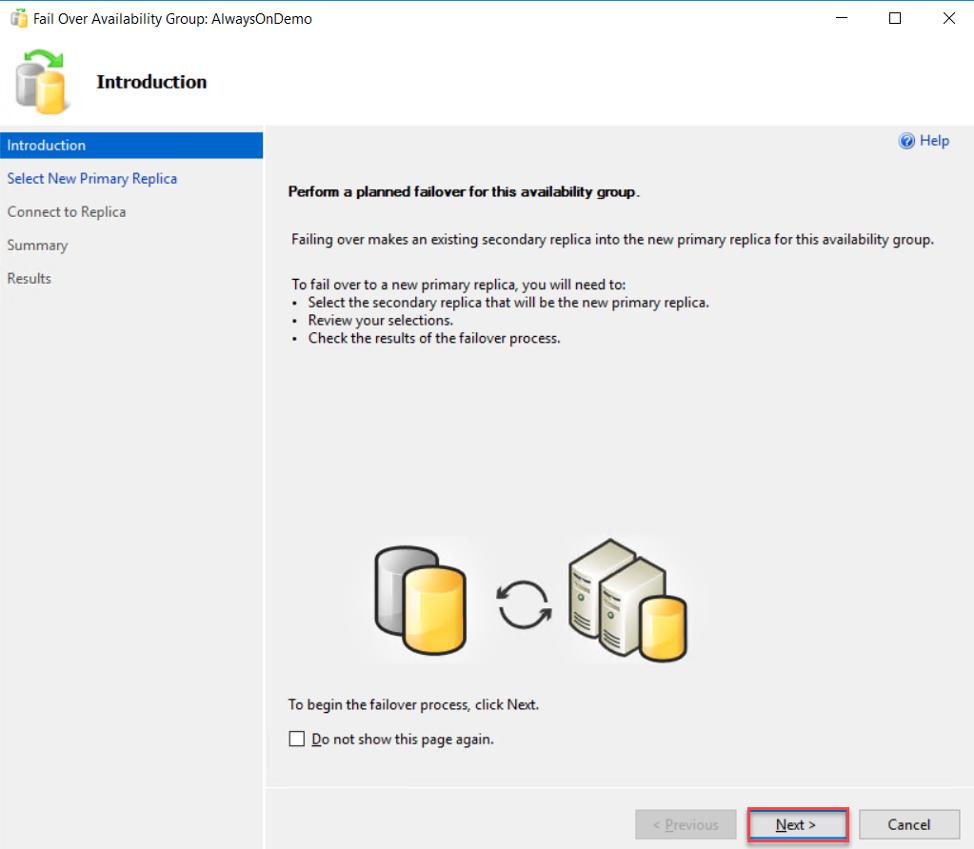
The first page in the Failover Availability Group wizard is the Introduction page, that provides a summary of the actions that can be performed in that wizard. Review the introduction and click Next to continue:
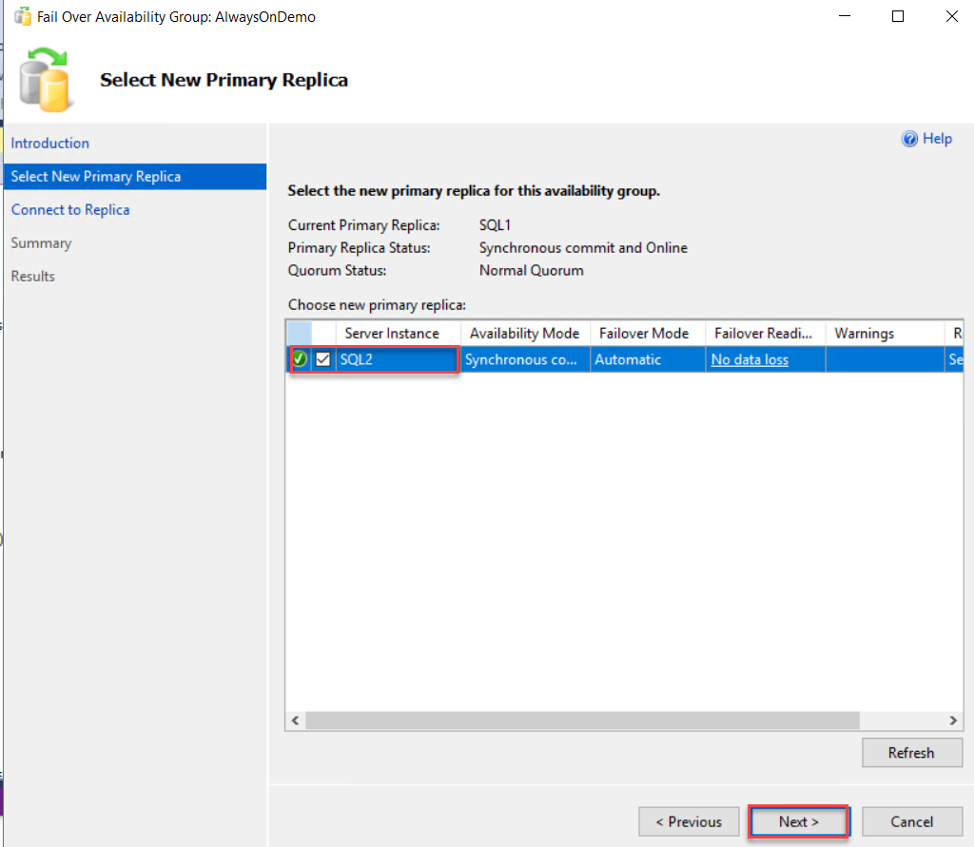
In the next page, select which node will act as the new Primary replica, making sure that there is no data loss will happen when the failover operation is performed, then click Next to proceed:
After that, you should connect to the new Primary replica that you select in order to make sure that this replica is online and reachable, as shown below:

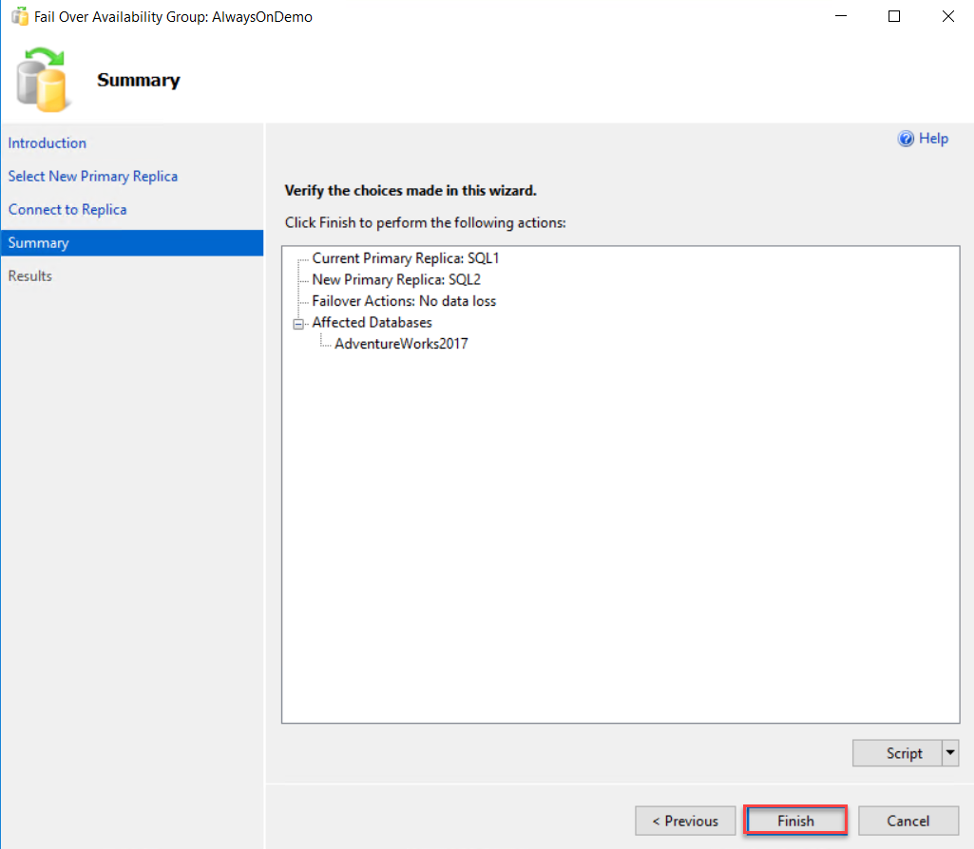
Then review your choices within the Failover wizard in the summary page and click Finish to start the Failover process:
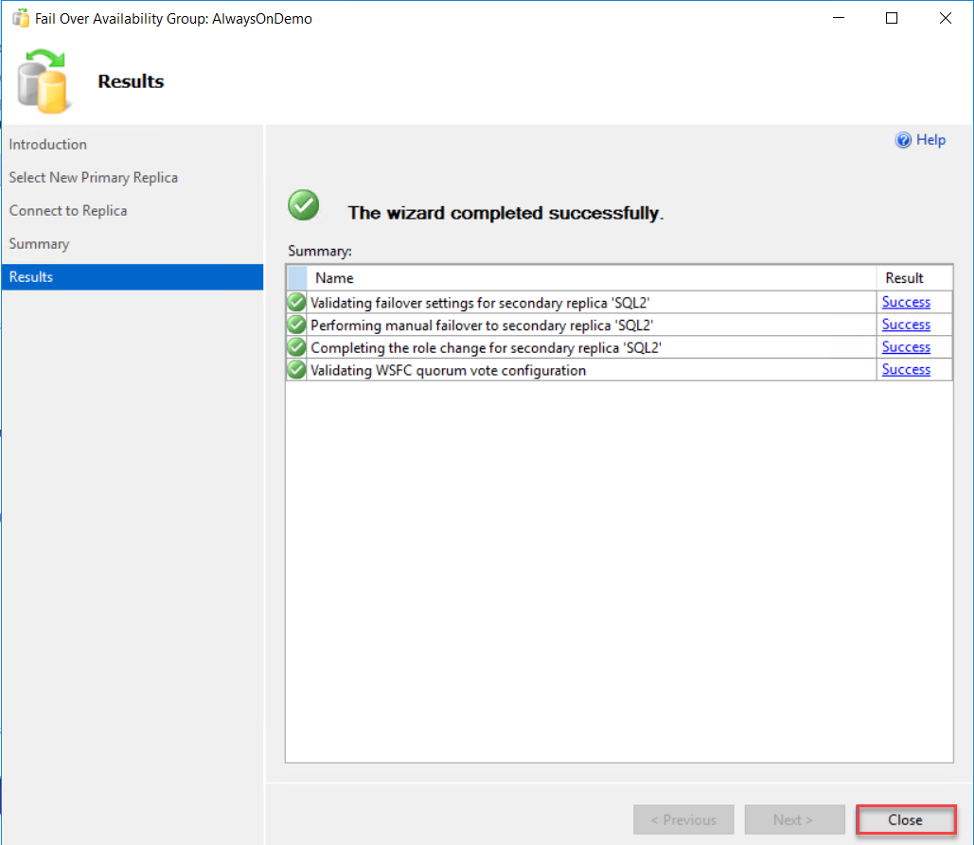
When the failover completed, review the results page to make sure that there is no issue faced during the failover process, as below:
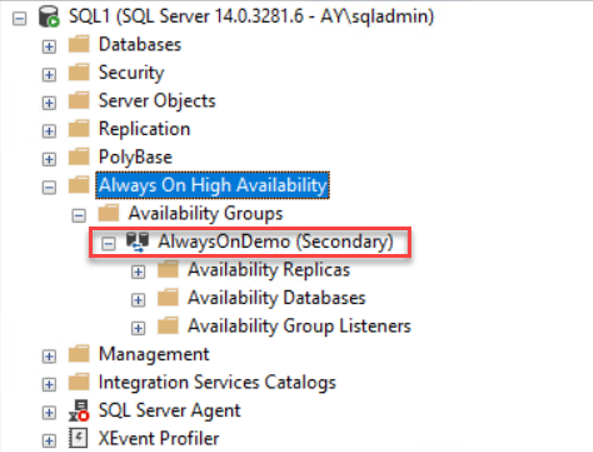
From the SSMS Object Explorer, the role of the SQL1 replica will be changed directly to Secondary, as shown below:
In this article, we described in detail, the steps that should be performed to prepare for the Availability Group site creation and how to create and configure the Always-on Availability Group site. In the next article, we will see how to troubleshoot the issues that you may face with an existing Availability Group site. Stay tuned.